Welcome

My name is Lisa and I'm a crafty girl with wanderlust working as an engineer by day. My blog chronicles projects in my home as well as pictures and stories from my travels.

Search


Instagram

Blog Index
The journal that this archive was targeting has been deleted. Please update your configuration.
Navigation

Entries in Home Decor (63)

Wednesday
May142014

Curtains for the Master Bedroom

After rearranging the master bedroom to fit in our new king size bed I wanted to add some new curtains to replace my roman shades. Being a 140+ year old house, the windows are a bit of a crazy situation. The windows on the front of the house sit a little lower down then the ones on the sides plus one of the side windows is a larger replacement window I had to install to bring the house up to fire code for egress. I thought by using some shades and curtains I could disguise the mismatch of windows in the room.

After a little hunting around I found some pretty steel and ivory canvas curtains from West Elm marked down from $44 to $19.99 and jumped on buying them. I then bought allen + roth natural fiber roman shades and Threshold knob drapery rods in brushed nickel from Target. 

I bought 72" length shades so that I could hang them right under the beams in the room. This not only makes the windows seem taller but also helps mask fact the the windows on the front of the house are lower than the ones on the side.

Next I hung the curtains snugly under the beams. It is really amazing how these two windows which are the same size can look so different with a change of window treatment. I just love how the window on the right appears so much larger.

The new window treatments make the room seem so much larger and taller plus it makes the crazy window situation appear much more uniform. I am so happy with how it all turned out.

Pulling the curtains a little closer together on the window along the side of the bed disguises the fact that it is over a foot wider than the other windows.

Next up I want to add some art over my dresser in the corner. It is going to be a little tough since the dresser is on an angle but I have an idea that I think might work.

Have you been doing any refreshes in your home this spring?

Monday
Apr142014

Rearranging the Master Bedroom

After I moved back to the US from living in Japan I set up my bedroom with my bed between the windows. I liked the setup so I never changed much in the intervening years.

When Frank and I got married and he moved in things needed to change. While my full size bed was fine for my life as a single lady Frank is a foot taller than me and there was no way it was going to work anymore. Since we also needed more storage space for Frank's clothing I set about looking for a king size bed frame with storage drawers.

I spent a little while hunting around for something just right. Some frames had drawers only on the sides or only on the ends but I wanted both. I also wanted something that would coordinate well with the antique dressers I inherited from my great grandmother.

Finally I found the Abbott Storage Bed at Art Van. It had a classic style with six deep drawers plus the mahogany stain was just the right color.

Purchasing the king size bed necessitated rearranging the layout of the room. The full size bed had barely fit between the two windows at the front of the house and the king bed looked quite awkward in that spot. After a combination of sketching a few things out and moving things around I came up with a new room layout that I liked.

I started by putting the new king bed centered under one of the windows which opened up the other side of the room. Although I like the night stands that I have, they get in the way of opening the drawers closest to the headboard so at some point I would like to replace them with something wall mounted.

At the foot of the bed I put my one of my great-grandmother's dressers. I plan to remove the mirror from the dresser (it is simply screwed on with brace plates in the back) and mount the TV to the wall in the future.

On the other side of the room I centered Frank's great-grandmother's desk (a new addition to the room) under a window. I angled the second of my great-grandmother's dressers into the corner of the room since it looked too cramped flat against the wall. I love that we have furniture from both my great-grandmother as well as Frank's in our bedroom.

With the furniture layout worked out for the room I have a bunch of small things that I want to do to pull together the room:

- Hang new blinds and curtains
- Hang some art on the walls
- Get an area rug
- Remove the mirror on the dresser and mount the TV on the wall
- Build shelf night stands 

So far Frank and I have loved our new bed and the storage has been a wonderful addition to our room. I'm excited to get the room all organized and finished.

Friday
May172013

New Curtains for the Living Room

With Frank and I getting married in two months we have been working through combining his things with mine at my house. One of the big items under consideration is what to do with the TV.

I have only ever owned one TV, a TV/VCR combo that I bought used over ten years ago that is up in my bedroom. Frank, however, is a man of electronics and felt that I should join the rest of humanity that has a TV built in this century in their living room. Compromise won the day and Frank's enormous TV (by my standards, he thinks an 80" TV would look much better) moved into the living room but I got to put it on a cute sideboard that I had instead of Frank's glass and metal TV stand. 

The only problem is that with super couch taking up a large area of the living room there is only one wall to put the TV on, which happens to have two windows on it. I tried a bunch of things like centering the TV between the windows and centering it on the window to the right but everything looked awkward.

I decided that the best solution would be to hang curtains all along the wall. I looked around a bit and found three great options from the Target Threshold line that I brought home. Since Frank is going to be living here, too, I decided to start getting his opinion on decorating matters around the house and asked him about the curtains.

I ruled out the navy curtain with cream embroidery on the left right away since it was a more purple hue than the rug and really clashed. I was partial to the middle one but Frank hated it. He said that it looked like a really bad shower curtain and that he wouldn't wish that curtain on his worst enemy and then proceeded to make jokes about the curtain for the next few days.

That meant the curtain on the right was the clear winner. It is navy blue with some thin stripes of shades of blue and white running across it. The fabric is a nice heavy weight and the curtain is fully lined with white light blocking fabric. Curtains can be pricey and these seemed to be a great quality for the price.

The store only sells the curtains in 84" lengths, but I was able to order them online in 95". I used a brushed silver drapery rod and four panels to create my wall of curtains.

I really like how it turned out and it is a good step in the right direction, I think. I still have a lot to do, like some wire management, finding a solution other than a kitchen stool for the cable box and figuring out how to balance out the TV being off center on the wall.

I also got another set of curtains for the window that is over the couch. Having done this is giving me the itch to paint the walls (I want to go with a lighter color to balance out the dark curtains) but there are other larger projects that need to come first. My house is a never ending project but I love it.

Just for fun, and to look back at how far things have come, here is a photo of this same spot in demo mode about a month after I bought my house. Plaster and lathe removal, I do not miss you...

Thursday
Apr042013

New Hutch For the Dining Room

This past weekend I spent most of my time resting on the couch and watching the NCAA Tournament on TV, but on Saturday Frank and I did head out to the Treasure Mart, which is a great furniture and house wares consignment shop in town.

Since we are getting married this summer we are making plans for Frank moving in with me. As part of figuring out merging households we need a bit more closet space in the master bedroom to fit all of our clothing so we were looking for a clothes armoire.

We struck out on the armoire front, but on the way out of the store this beautiful hutch caught our eye. It is a lovely antique with gorgeous wood and solid construction. It had been there for two months, so it was marked down twenty percent which was nice as well. Being a large piece I wasn't sure where it would fit in the house so I measured it (I carry a tape measure in my purse, of course!) and we headed home.

Back at home I measured the space on the dining room wall and it looked like a perfect fit. Frank and I talked about it and decided to get it. I called the Treasure Mart and paid for it over the phone and they arranged to deliver it to us on Monday.

Previously on that wall I had a bookshelf that I had built with bricks and bi-fold doors right when I moved back home from Japan. It's been four years so it was time for a change. Here are a few shots of what the wall used to look like.

Here is the view from the living room of the hutch in place. It fits the space perfectly and makes quite an impact. It's hard to tell from the photos but we have just shy of three feet clearance to the couch and about four feet to the dining table.

I'm excited to have the extra storage and can't wait to fill it up. I think maybe we'll put linens below and dishes up top. I have a bit of a problem with having too many sets of napkins and tablecloths...

My favorite part are the drawers which have hand sawn dovetail joints and birds eye maple fronts.

From afar the hutch looks great but it does need a little work. There are some scratches on it and I am thinking of trying Restore-A-Finish to see how that works. Also, the glass is only being held in by glazing points so I will need to add some glazing putty to keep the glass secure.

I'm really excited to get the hutch cleaned up and get it filled. I absolutely love it!

Monday
Jan212013

Pantry + Pictures for My Kitchen

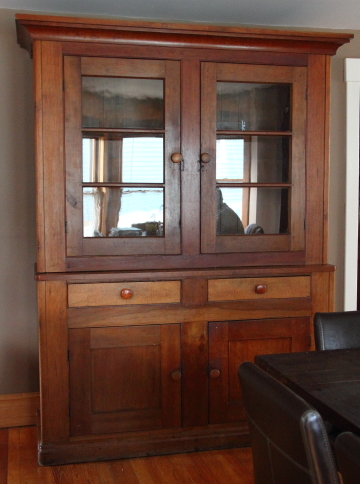
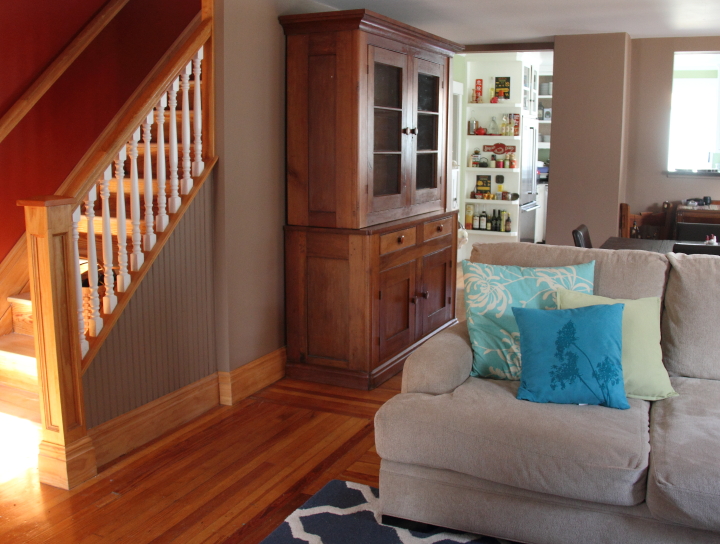
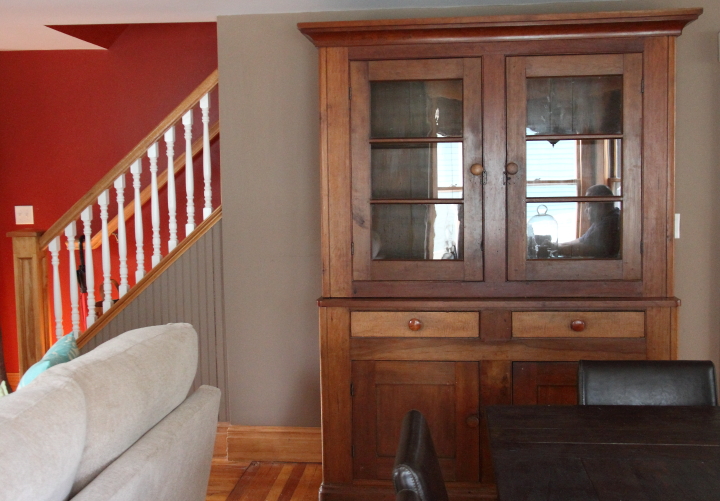
In my kitchen I have a little nook in the corner between the doorway to the living room and the doorway to the laundry room. Ever since I have owned my house and remodeled the kitchen it has just sat there empty. Long term I have plans to build myself a hutch in that space with an outlet and a place to store my counter top appliances out of the way.

If I am being realistic, however, there is no way that I am going to have time to build the hutch anytime in the next few years with other projects taking precedence. I finally decided to get myself in gear and give my little nook some love to make it useful for myself in the meantime.

Since this is only a temporary solution I wanted something inexpensive but that would also match the style of the white cabinets in my kitchen. I searched around a bit and found a small pantry on Overstock for $115. The style was pretty close and the price was right so I bought it.

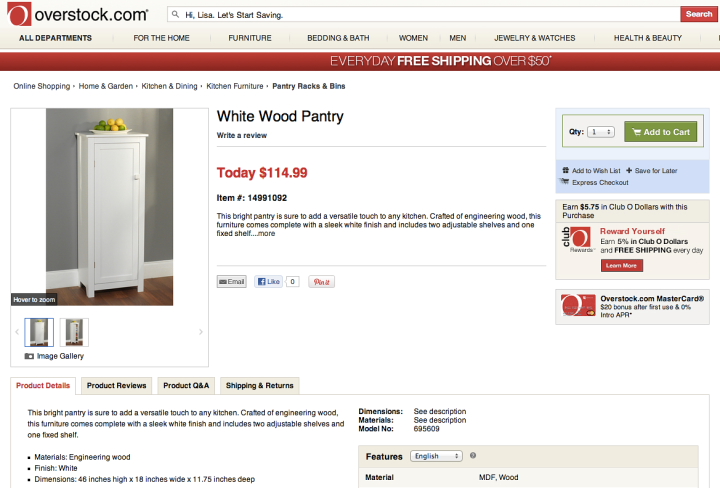
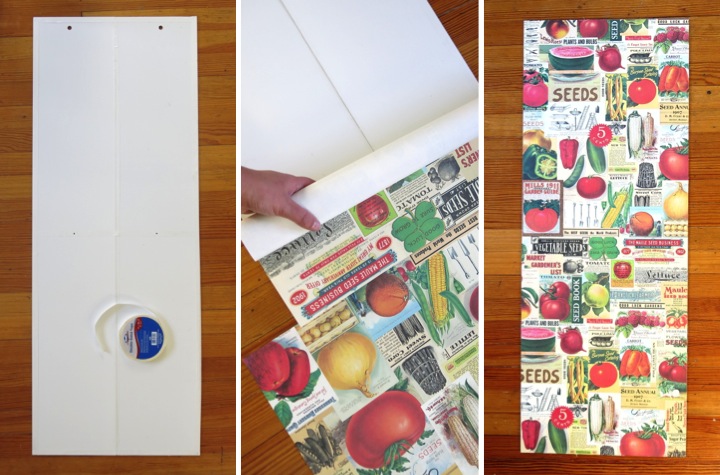
When the pantry arrived I opened the boxes and set out the pieces to start to put it together. It was at this point that I noticed that the back was actually two pieces hinged together with a piece of tape. It looked a little cheap so I decided to cover the back with some cute paper that I bought at a local stationary store.

I've had luck with hanging wallpaper on the back of my bathroom built in with double sided tape so I decided to use the same method again. I put tape along the edges of the board and down the middle. The board needed two pieces of paper so I lined one up along the left side edge and the middle of the board and the second piece above that but aligned to the right edge. This made it so that my seam would be hidden behind the middle shelf and so that the repeat of the design would be staggered. Also, the tape is super sticky so to attach it I rolled it up, aligned it and then rolled it out over the tape, smoothing it as I went. To finish I just trimmed the excess paper from around the board.

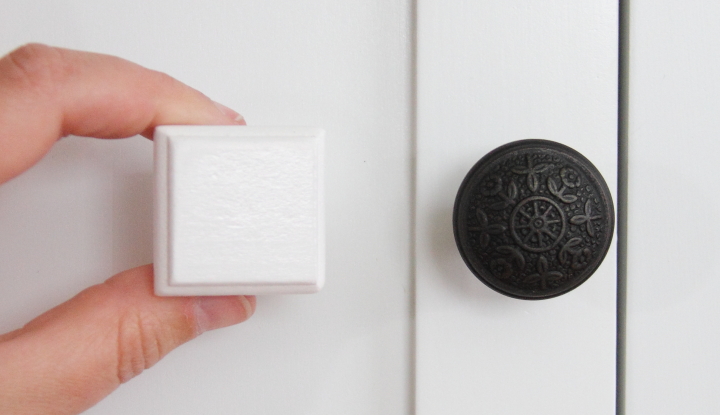
With the back decorated I set about putting the pantry together which took about half an hour. In addition to adding the paper to the back of the pantry I also decided to swap out the knob. The knob that came with the pantry was a plain square wood knob painted white, which didn't really go with my other cabinets. I had already purchased extra knobs and pulls (Season from Restoration Hardware) for when I build my hutch someday since I was worried that maybe they would be no longer available by the time I got around to it. Using the knob that matches my other cabinets is a small detail, but I think it really helps to tie the pantry in with the rest of the kitchen.

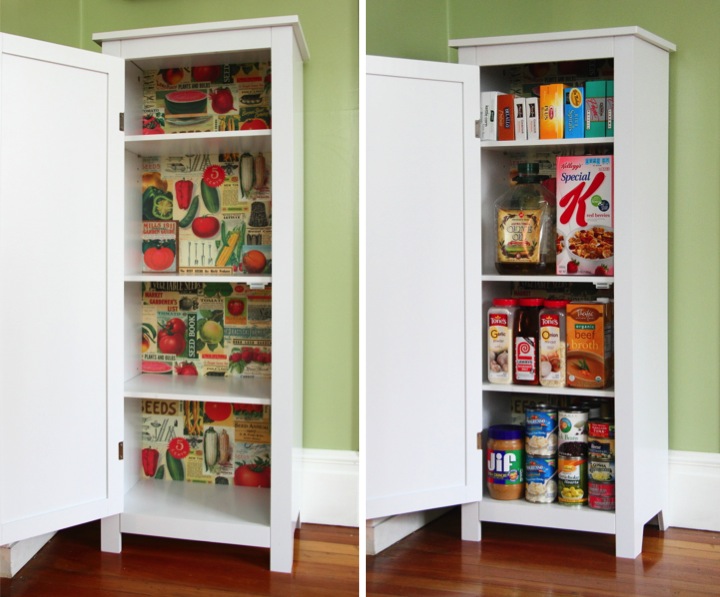
Assembled, I think the pantry is pretty cute and I quickly filled it up with food. You can't see much of the paper once the pantry is full, but I still like the added touch. 

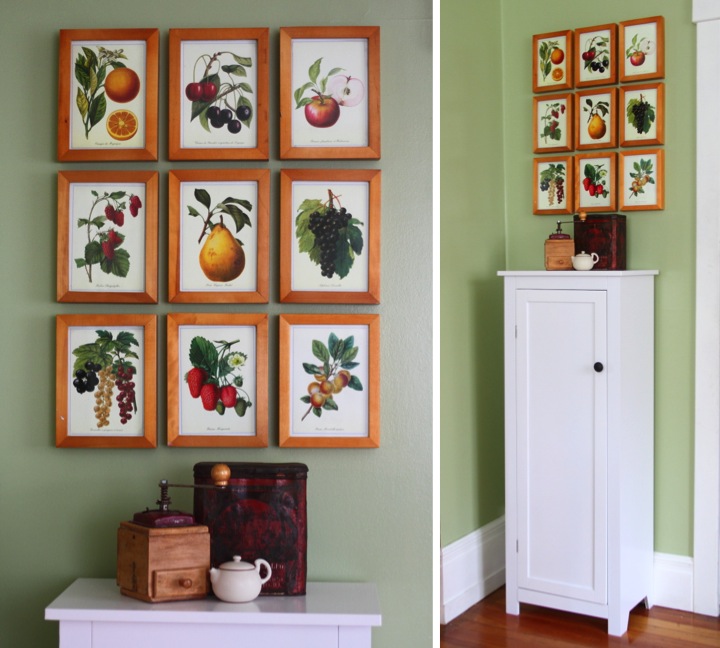
The pantry looked a little bare on the wall by itself so I decided to hang my French fruit prints over it. I bought the prints on my first trip to Paris back in 2002 from one of the little book stalls along the Seine. As an aside, when Frank and I were in Paris this spring I spotted the same exact prints for sale as we were walking along the Seine so I bought another set, just in case my old set fades over time from sunlight. They were only 50 Euro cents each so I couldn't resist.


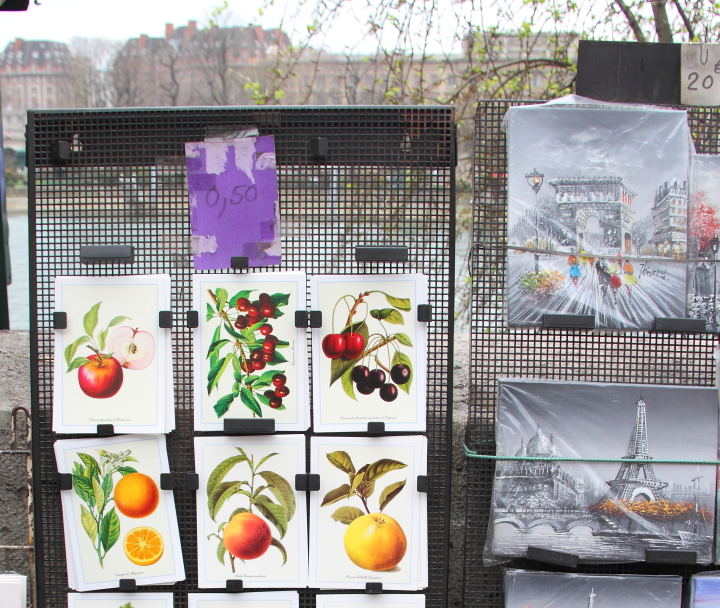
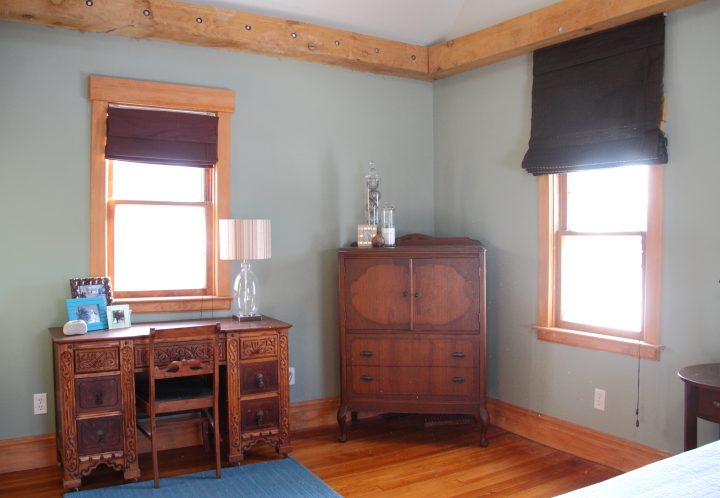
Years ago I had put the fruit prints in Ribba frames from Ikea (the ones I have are no longer available) and have hung them in the kitchen of my previous homes, but I've never gotten around to hanging them up in my current home. This seemed like just the perfect spot.

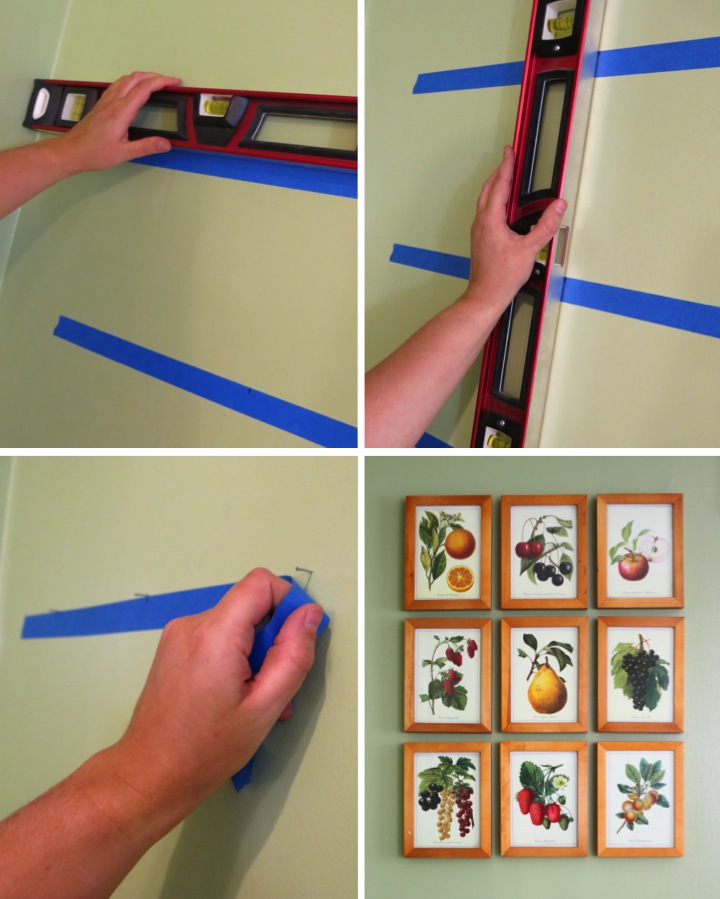
I have ten prints but a three by three grid seemed to fit the space best. To make sure to have even spacing I used some painters tape and my level to create a level line where I wanted my bottom row to hang. I then measured up 8-3/4" (giving a 5/8" gap between frames) and put up another line of tape, again making sure it was level. I repeated one more time to have three rows.

Next, I measured to the middle point of the wall on the middle piece of tape and made a mark. I then lined my level up to the mark, made sure it was plumb and then used my level to mark the top and bottom piece of tape. I measured to the right of the mark 6-3/4" (giving a 5/8" gap between frames) on the middle piece of tape and then marked the top and bottom piece using my level again. I repeated the same steps to the left to finish my marking.

I sunk a picture nail at each mark and then pulled the tape off the wall, leaving me nine nails in a perfect grid to hang my pictures.

I really love these prints and seeing them up reminds me of walking along the Seine and all the wonderful memories of that very first trip abroad for me. I can't believe it has been nearly eleven years. I also can't believe that it has taken me so long to get these hung...

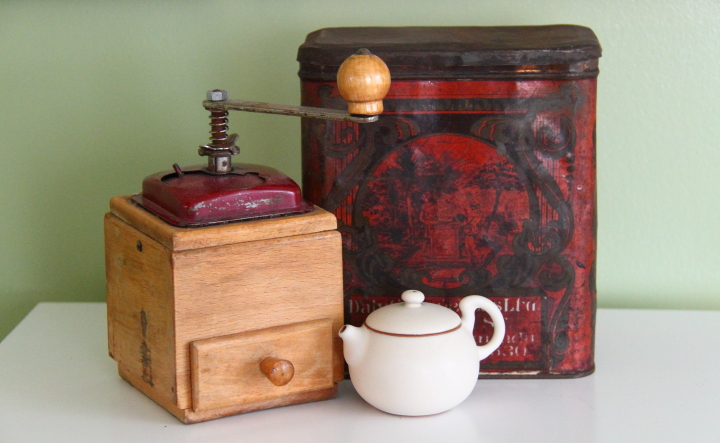
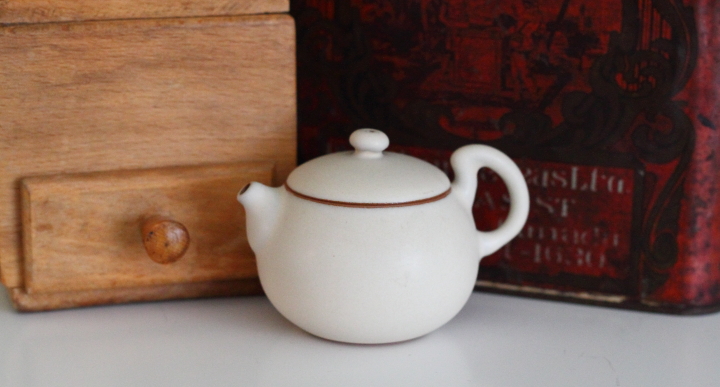
As a last step the pantry needed a few items on top to balance things out. My coffee grinder that I bought in Sicily has a wood tone that is a great match to the wood frames of my prints so I started with that. I then placed an antique tea tin that I found at a shop in Ontario in the back with a tiny tea pot I picked up in Taiwan in front. Cute, simple and full of memories: just the way I like things.

I am really happy with how my nook turned out and very glad to have the extra food storage space. For me it is a great temporary solution until I build my hutch someday. Someday...

Have you given an unloved space in your home an update recently? What did you do?

Monday
Nov192012

New Living Room Rug

After getting my new living room sectional (AKA Super Couch) a month ago I have been on the look out for a rug. Previously I had a light grey rug in the room but the oatmeal color of the sectional clashed with it so something new was in order. 

Finding a rug that would fit the bill was a little tricky. My sectional is square so I wanted an 8' x 8' rug which limited my options. Additionally I wanted something with color since the walls and couch were already neutral, but at the same time I wanted a rug that would go with a variety of color schemes if I decided to chance things up. On top of that I didn't want to spend a ton of money.

Luckily, I was checking out One Kings Lane and found something perfect: a Safavieh 8' x 8' Mulberry Rug in Navy Blue and Ivory. It seemed just right. The navy would add a little color but would be versatile in a number of color schemes. It was also hand-tufted wool and the pile was 1/2" so a nice compromise between being comfy and being dense for a high traffic area.

The rug was listed at $379.00 but there was a special running that day for 30% off Safavieh rugs so I got it for $265.30. It wasn't cheap but that is a really great price for a hand tufted wool rug so I decided to order it.

According to the website, the rug wasn't supposed to arrive until sometime between November 29 and December 4, so I was pleasantly surprised to have it arrive on Friday. Needless to say I was pretty excited and had to open it up and roll it out in the living room right away.

The color is a little more royal blue than navy but I love it. I really think it pulls the space together. I just need some fabric with some lime, teal and royal blue to make a few pillows to tie it into the color scheme.

The rug is really comfortable and a fun surprise that I couldn't tell when ordering online is that the pile of the ivory is just a smidge taller than the blue which gives it a little dimension. 

I am really happy with the rug and looking forward to getting some of the other things done in the room like window treatments, painting the trim and countless other little things. Slowly but surely I will get there...

What do you think of the rug? Have you been doing any decorating or purchased anything new for your home lately?

Thursday
Nov082012

Secondhand Treasures

Last weekend I picked up a few secondhand treasures at the Ann Arbor ReUse Center and the Treasure Mart and I thought I would share. Some of the items look a little rough right now, but I have fun plans for them.

In the top left corner is a cute little tin with a lovely stamped design on the side. The gold and green is a little much for me but I think with some spray paint it could be a cute addition somewhere in my house.

Below the tin is a lazy susan that I picked up for a dollar. It's in a little rough condition, but with a little sanding and painting it will look as good as new. I plan to use it for an organization project.

In the top of the middle is a red Le Creuset salt cellar than I bought for $6. It was brand new and still had the tags on it. It will be perfect in my kitchen.

Below the salt cellar is a little pewter chalice that I picked up for $0.50. I think it will be cute as a vase for flowers or branches.

On the right side is a wooden frame that I grabbed for $2. I liked how the corners were rounded off instead of square. The gold and green chippy paint is sweet, but I am not sure yet if I will keep it or do something different with it.

Inside the frame is a stone tablet with the Golden Gate Bridge on it. I know it looks really cheesy right now, but it is a bit of a throwback to my days living in the Bay Area plus it was only a dollar and I have a fun makeover plan for it.

Have you picked up any fun secondhand things lately? What was your best deal?

Sunday
Nov042012

New Master Bedroom Closet Light

After working on some projects for my master bedroom closet, including my laundry sorter and shoe organizer I decided it was finally time to replace the light fixture.

When I redid the electrical when gutting the main section of the house I had to purchase a ton of new light fixtures quickly. In cases where I just couldn't find anything I liked in my price range I ended up just getting a super cheap fixture from Lowes as a placeholder to pass my electrical inspection. In my closet I had a little light fixture that was only $10. While it was perfectly respectable for its purpose, I decided it was finally time to find something a little prettier.

Nice looking flush mount or semi flush mount fixtures can be really tough to find. Also, since my house is originally from the 1800s I like to have my fixtures look classic and not too modern. Add into the mix that I didn't want to spend a ton of money and it seemed like finding the right light was going to be a needle in a haystack type of problem.

Off and on I would poke around a bunch of different lighting websites looking for something that fit. Then one day I found a semi flush up light from Progress Lighting's New Bedford collection on LightingDirect.com. The fixture looked classic and the price was great, too. With a discount code I got it for under $30. The only thing I was hesitant about was the glass shade which looked a little modern. I figured that for the price it was worth the gamble and decided to go ahead and buy it.

After the new fixture arrived, replacing it was easy. I simply switched off the breaker on my house's electrical panel for the closet, removed the old fixture and disconnected the old wires, reconnected the new wires and attached the new fixture. Each fixture is different but the same basics usually apply: black wires connect to each other, white wires connect to each other and the grounding wire connects to a grounding screw on the grounding bar.

I really like the new fixture, but I was right about the glass shade not being my look. The frosted seed glass really looks modern so I am on the lookout for a vintage shade on eBay that I can replace it with. I'd like to get something with a milk glass look like my hall light shades or my bathroom light shades. I do think even with the current shade this is a big improvement toward making the closet look nicer, plus I can put in a higher wattage bulb making the closet brighter. 

Next up in my closet I need to paint the trim and maybe put some color on the walls. I also want to build some crates for the shelves so that I will actually be able to use and organize them.

Have you been doing any closet organizing or upgrading? Do you have a lot of closet space or do you have to be creative to use what you have?

Saturday
Nov032012

Resolution Recap: October 2012

How can it already be November? Where is this year going? Anyway, I am back with an update on my two 2012 New Year's resolutions of purging and organizing my home and finishing up some of the many projects I have going on around the house after not providing a recap about September. I had a lot going on in September at work and personally so I just didn't get that much done.

October was a little better for me on the resolution front. I did manage to get a little more done this month and while it wasn't my most productive I'm doing my best. In the words of an old boss of mine, "Do the best you can do. That is all you can do." 

Resolution 1: Purge & Organize
My goal of having a volume of at least one trash cart (between my recycling and regular trash) out on the curb on garbage pick-up morning every Monday was up and down in October but if you look at the average it isn't bad. Here's my breakdown:

- October 1: 1/2 full trash + 1/2 full recycle = 1 total
- October 8: 1/4 full trash + 1/4 full recycle = 1/2 total
- October 15: Nothing (In Woodstock)
- October 22: 1/4 full trash + 0 recycle = 1/4 total
- October 29: Overflowing full trash + 1 full recycle = 2+ total 

On the organizing front I built a shoe organizer for my closet door and I am trying to purge a bunch of my unused craft items

Resolution 2: Finish Up Projects

In getting some of my rooms updated I got a new dining table and new sectional and moved an old beloved table into the room. I didn't have much time to devote to projects since I was focusing more on cleaning, but I hope that November is a little better.

Did you work on any projects or do any purging at your house this past month? Are you still trying to stick to any New Year's resolutions?

Sunday
Oct282012

Mini Pumpkin Wall Art for Fall

After making my sweater vase I thought I would create some wall art to continue with my Autumn decorating in my living room. I wanted something that would work for both Halloween and Thanksgiving and figured that mini pumpkins would be a perfect fit.

I came up with the idea of mounting the pumpkins in a little three by three grid and headed to Lowes to figure out a good idea of something to serve as a mounting board. I toyed with the idea of planking together some boards, but when I saw that I could get a 1/2" thick 2' x 2' oak plywood panel for $8.50 I was sold on that solution. I picked out the panel with the prettiest grain and picked up some white mini pumpkins on my way home.

With supplies in hand I started by staining the plywood with Watco Danish Oil in Dark Walnut. I like using it because it is really easy and you can't really screw it up. That's my kind of staining! After you prep your surface by sanding and wiping it down, you simply flood it with the Danish Oil and use a rag to spread it around until the whole surface is covered. After letting it penetrate for half an hour you apply the Danish Oil in the same way again. Fifteen minutes later you wipe off the excess and your piece is ready to use eight hours later. Here is my plywood before and after I stained it:

Since I was using plywood I had to figure out a way to cover the rough edges. I decided using some white iron-on melamine banding would be fun and help set it off from the wall. The edging I had was 3/4" thick and I thought it would look neat if the board seemed thicker so I took some scraps that were 1/4" thick and used wood glue to attach them around the perimeter on the back. After that I simply cut the lengths of the banding that I needed and ironed it onto the edge.

Next up I tackled the mini pumpkins. I had purchased white ones, but they are really cream colored and I thought a true white look would be better for my project, especially since I had used the white band for the plywood. That was an easy fix with a can of white spray paint. With two light coats of matte white I think the pumpkins almost look like little ceramic sculptures.

Once everything was dry I was ready to start assembling. On the back of the board I marked the center and then marked the remaining eight locations for pumpkins in a grid with 5" spacing. I drilled pilot holes at each of the locations and then started 2" screws in each hole. To mount the pumpkins I held them over the pilot hole in the front and the drilled the screw from behind the plywood into the pumpkin.

With the pumpkins mounted I thought it looked really cute but needed a little finishing touch. I took some scraps of white vinyl contact paper cut it into 1/4" wide strips and made a border around the pumpkins.

I think my mini pumpkin wall art turned out really cute. It is festive, but the neutral color scheme doesn't clash with the colors in my living room.

Are you doing any decorating for fall? Have you ever spray painted pumpkins?

P.S. If you are interested, I've gathered together a gallery of my autumn related posts: Gallery of Fall Posts & Projects