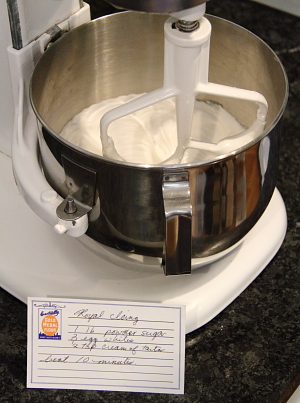
Welcome

My name is Lisa and I'm a crafty girl with wanderlust working as an engineer by day. My blog chronicles projects in my home as well as pictures and stories from my travels.

Search


Instagram

Blog Index
The journal that this archive was targeting has been deleted. Please update your configuration.
Navigation

Entries in Recipes (26)

Monday
Apr162012

Making Limoncello

Having recently come back from being on vacation in Italy, I have been missing sipping on some limoncello after finishing my dinner. When I spotted some Sorrento lemons on sale at my grocery store for half of the price of regular lemons I knew it was a sign that I had to make some.

Although it requires some time for the lemon peels to steep in the alcohol, limoncello is really quite easy to make and is wonderful either by itself or as part of a mixed drink.

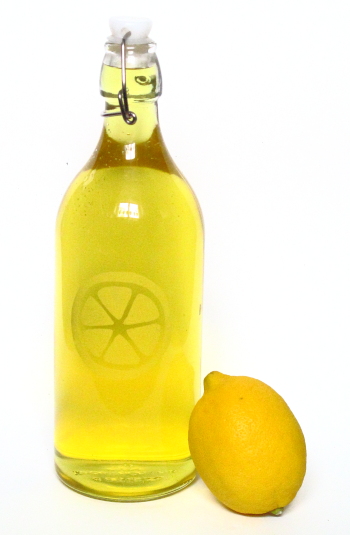
Limoncello is a lemon flavored liqueur from Southern Italy that is often served chilled as an after dinner digestivo. Traditionally made with Sorrento lemons it is especially famous in Sorrento, Capri and along the Amalfi Coast.

My first time drinking limoncello was when I was in Italy ten years ago and a waiter brought me a tiny glass for free after a meal.  The sweet, lemony flavor always bring back memories of that trip and now memories of my recent trip as well. Salute!

P.S. If you want to know how I made the lemon design on my bottles, check out my DIY glass etching tutorial.
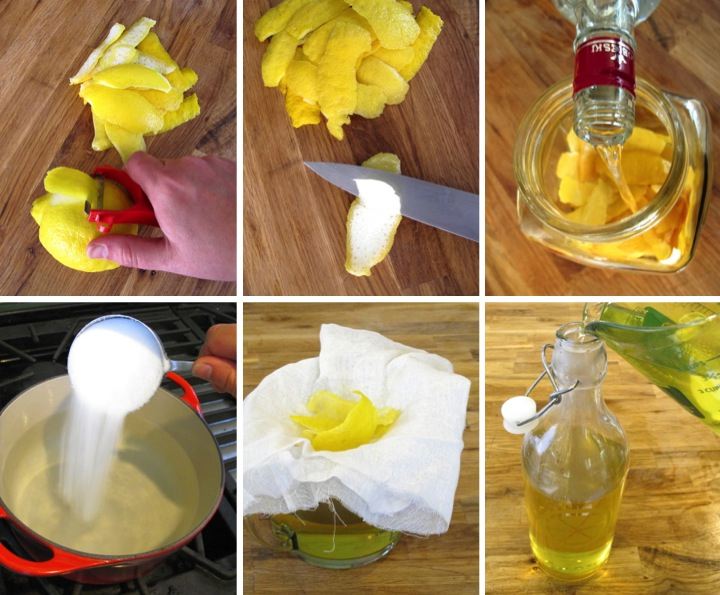
Ingredients List
- 10 lemons
- 750 ml bottle of vodka
- 2-1/4 cups sugar
- 3 cups water

Directions
- Clean lemons and then using a peeler, peel the skin in wide strips
- Using a paring knife, remove all traces of the pith (white part)
- Place peels in a glass jar with vodka and let sit at room temperature for at least seven days
- Make simple syrup by bringing water and sugar to a boil
- After boiling for 15 minutes, allow simple syrup to cool to room temperature and stir in vodka mixture
- Using a cheesecloth, strain and then pour into glass bottles 

Tips and Tricks
- If you can, try to use Sorrento lemons, but if you can't find them the recipe still works great with other lemons
- Ten lemons is based on a typical sized lemon so if your lemons are much bigger or smaller you can adjust the number
- Make sure to remove all of the pith otherwise the limoncello may have a bitter taste
- Instead of peeling the skin, you can use a zester but I like the large strips because I can save them to make into candied lemon peel
- After peeling the lemons, squeeze them for their juice which you can use in other recipes
- Allowing the lemon peels to steep longer is supposed to give a better flavor, but the most I can usually make myself wait is a week 
- Adjusting the sugar to water ratio will make the limoncello more or less sweet depending on personal preference
- Storing your limoncello in the freezer ensures that it is always ready to be served 

Saturday
Mar172012

Royal Icing Recipe

My grandma passed on this royal icing recipe to me. It is a pretty standard recipe and she used it to make roses for wedding cakes that she made and sold out of her home kitchen. When I was little I was absolutely mesmerized by the way she would turn out the roses so quickly and methodically.

With my baking I don't have much need for royal icing roses, so instead I typically use this recipe for icing sugar cookies. I pipe an outline onto my cookie with stiff icing and then flood the design with thinned icing. It is a really easy way to make pretty designs on your cookies.

Another fun thing you can do is pipe royal icing into lacy designs on wax paper and then attach the designs to your baked goods once they are dry. The decorations are quite fragile, though, so it is always wise to make spares in case you break a few.

Ingredients List
- 1 lb. powdered sugar
- 3 egg whites
- 1/2 tsp. cream of tartar
- Food coloring (optional)

Directions
- Put powdered sugar, egg whites and cream of tartar in a mixing bowl
- Beat for 10 minutes for icing to achieve desired consistency
- Tint icing with food coloring if desired

Tips and Tricks
- Royal icing can dry out quickly start crusting over so using plastic wrap to cover the top of the icing with the plastic completely covering the surface of the icing
- If the icing is too thin, add more sugar; if it is too thick, add a bit of water or more egg whites
- If you are leery of using egg whites, there are recipes that use meringue power instead 

Sunday
Feb052012

High Rise Apple Pancakes

When I was growing up high rise apple pancakes were made in my family for breakfast for weekend special occasions. It was my favorite breakfast food and I loved watching the batter puff up in the oven. It seemed like magic.

As an adult this high rise apple pancake recipe is my go to dish for when I host brunches or have weekend guests at my home. Preparing it is simple and easy plus it is delicious and makes for a pretty presentation on the dining table. Serving it with eggs, bacon and a fruit salad creates a great spread for any morning meal.

Ingredients List
- 2 large apples: peeled, cored and cut into 1/4" slices
- 2 tsp. lemon juice
- 1/4 cup sugar
- 6 eggs
- 1-1/4 cup flour
- 1-1/4 cup milk
- 5 Tbsp. butter
- Powdered sugar (optional)
- Maple syrup (optional) 

Directions
- Preheat oven to 425° F (220° C)
- Toss apples with lemon juice and sugar in a bowl and set aside
- Melt butter in a 9" x 13" pan in the oven
- Combine eggs, flour milk and beat lightly
- Pour batter into pan once butter is sizzling and bake for 15 minutes
- Add apple mixture on top of the risen batter and bake for an additional 10 minutes
- Sprinkle with powdered sugar and serve with maple syrup 

Tips and Tricks
Baking apples, like Jonathan, Honeycrisp, Granny Smith or Golden Delicious, all work well with this recipes
- I like to use two different varieties of apples when making the recipe instead of two of the same kind
- For my workflow management I mix up my batter and start peeling my apples while the butter is melting and then slice the apples and toss them with the sugar and lemon juice while the batter starts baking
- When you mix the batter it will be a little lumpy
- The longer you bake the batter before adding the apples, the higher it will rise

Thursday
Jan262012

Curried Chick Peas

When I was in grad school I was broke and struggled to make ends meet with a small budget. A girl cannot live on macaroni and cheese and ramen noodles alone so I came up with this easy and cheap curried chick peas recipe.

I would watch the grocery store sales at my local Safeway and stock up on cans of chick peas and diced tomatoes when I could find a good deal. Besides being economical the chick peas provided me with some added protein in my diet and I ate this about once a week during grad school. Nowadays I still eat it once and awhile when I come home tired from work and want to make something fast and simple that I don't need to think about.  

Ingredients List
- 1 can of chick peas (garbanzo beans), drained and rinsed
- 1 can of diced tomatoes
- 1 Tbsp. curry powder
- 1/2 cup of fresh cilantro, chopped
- Salt to taste

Directions
- Combine chick peas, tomatoes, curry powder and salt in a pot
- Heat over a medium heat burner and allow to simmer for a few minutes
- After cooling a bit add cilantro and serve 

Tips and Tricks
- It is important to thoroughly rinse the chick peas in my opinion
- Although the recipe doesn't make a huge amount I find it filling so I would eat half of the recipe at a time. It tastes best if you add the cilantro just before you eat it so I would set aside half and only add cilantro to the amount I was going to eat right away
- To keep my cilantro fresh after bringing it home from the store I like to store it in a glass of water.

Monday
Dec262011

Seafoam Salad

I think it has to be a law of nature that every family in the Midwest of the US must have a time honored, treasured family Jell-O recipe. For my family that recipe is none other than the fabulously delicious seafoam salad.

Trotted out only for the special occasions of Thanksgiving and Christmas dinner, seafoam salad was the highlight of the holiday meals for my sister and I while we were growing up. For a seemingly disastrous period in the nineteen-eighties my grandmother tried an experiment where seafoam salad was served for Thanksgiving and a red and green Jell-O ribbon salad was substituted for seafoam salad at Christmas. Needless to say there was a major revolt in the ranks.

Even though my tastes have changed and grown, as an adult I still love this simple Jell-O recipe. Seeing the pale green Jell-O salad topped with whipped cream and maraschino cherries is like a time machine for me. It just tastes like the joy and magic of the holidays and makes me feel like a little kid again.

Ingredients List
- 1 can of sliced pears in heavy syrup, drained with juice reserved
- 1 package of lime Jell-O
- 1 package of cream cheese (8 oz.)
- 2 Tbsp. warm water
- 1 pint heavy whipping cream 
- Pear halves (optional)
- Maraschino cherries (optional)

Directions
- Over a medium heat burner heat pear juice to a simmer
- Remove pear juice from heat, stir in Jell-O until dissolved and set aside
- In a separate bowl, use a potato masher to mash cream cheese with warm water
- Add slightly stiff Jell-O and beat until fairly smooth
- After Jell-O mixture has cooled, use potato masher to mash pear slices into the mixture
- Whip up whipping cream and fold half into the Jell-O mixture
- Pour Jell-O mixture into a dish and place into the refrigerator
- After Jell-O has set up (about a half hour) finish by spreading the remaining whipped cream on top 

Tips and Tricks
- Although a potato masher works best with this recipe, in a pinch you could use a dinner fork to mash up the cream cheese and pears.
- For best success with whipping up whipping cream make sure that both the whipping cream and bowl are very cold. I like to pop my mixer bowl in the freezer for a few minutes prior to using it.
- I like to garnish my seafoam salad with pear halves that I have thinly sliced and maraschino cherries.
- To make sure that the maraschino cherries don't bleed red juice all over the whipped cream I rinse my cherries and blot them dry with a paper towel before adding them on top of the seafoam salad. 

Thursday
Dec152011

Curried Apple Pumpkin Soup

With winter well underway I am constantly craving soups. There is nothing like a hot bowl of soup to warm you up after coming in from the chilly weather. It makes me feel all warm and cozy inside.  

My favorite soup in the fall and winter is my Curried Apple Pumpkin Soup which I made last night for dinner. It is rich and creamy with a great slightly spicy flavor. With a baguette of crusty bread it is a perfect comfort food meal for me.

It is a pretty simple soup to make, especially if you have an immersion blender to puree the soup. Without further ado, here is the recipe.

Ingredients List
- 1/2 c. butter
- 1 bunch of leeks (2 big leeks or 3 small leeks): white part chopped
- 1 small sweet onion: chopped
- 1 Tbsp. curry powder
- 3 apples: peeled, cored and chopped 
- 2 c. pumpkin puree
- 4 c. chicken stock
- 1 pint heavy cream
- Salt and pepper to taste
- Cayenne pepper (optional)
- Pumpkin seeds (optional)

Directions
- Over a medium heat burner melt butter in a stock pot and then add leeks, onion and curry powder, cooking until nearly translucent
- Add apples and cook for a few minutes more so that apples are soft and onions are translucent
- Stir in pumpkin and chicken stock and simmer for 20 minutes until all vegetables are very soft and tender
- Remove from heat and use a blender to puree soup
- Finish by stirring in cream and adding salt and pepper to taste

Tips and Tricks
- I like to use pumpkin puree that I made from sugar pumpkins but you can also used canned pumpkin
- For blending I love using my immersion blender (best $24 I ever spent!) since I can puree it right in my stock pot which means less clean up 
- If you do use a traditional blender be sure to only fill the blender less than halfway otherwise you could potentially make a hot, exploding mess (unfortunately, I know this from personal experience)
- If you are vegetarian you can substitute vegetable stock for the chicken stock 
- For a little extra zing try adding some cayenne pepper to the soup
- I like to reserve a little cream and use it along with some pumpkin seeds to garnish the soup

Page 1 2 3