Welcome

My name is Lisa and I'm a crafty girl with wanderlust working as an engineer by day. My blog chronicles projects in my home as well as pictures and stories from my travels.

Search


Instagram

Blog Index
The journal that this archive was targeting has been deleted. Please update your configuration.
Navigation

Entries in Crafts (42)

Monday
Mar192012

DIY Puzzle Birthday Gift for Grandma

My grandma loves doing puzzles so this year for her birthday I thought I would make her a puzzle with a Happy Birthday message on it. Since her birthday is just after Frank and I get back from Italy I made this before we headed off on our trip and mailed it to her with strict notices on the outside of the box not to open until her birthday.

To make my puzzle I started by buying a kid's puzzle for a dollar from the Target One Spot. I liked this puzzle because the wide rectangle shape would work well with adding my message to it. 

When I got home from Target I covered a board with butcher paper and then put together the puzzle. I then took it outside and using light coats of matte spray paint I painted the puzzle white. Because of the colorful design it took five coats before it was completely white.

I let the puzzle dry over night and then started adding my design with pink and teal markers. To add the word "Grandma" I used pencil transfer. I printed the word out on a piece of paper and then lightly penciled over the areas of the letters on the back side of the paper. I then put the paper right side up in the position I wanted and traced the outline of the letter which caused a light graphite transfer onto the puzzle. From there I went over my pencil guidelines with dark pink marker and then filled in the letters with light pink. I used a teal marker to write "Happy Birthday" and "Love Lisa" and then used the pink and teal markers to make a border to finish it off.

I think the puzzle turned out cute and it was fun to make. At only a hundred pieces this is a much smaller puzzle than Grandma usually works but hopefully it is still fun for her. Happy Birthday, Grandma!

Tuesday
Mar062012

Before & After: Cookbook Stand

I love cookbooks. I have a ton of them and I enjoy flipping through them for inspiration. Some of the cookbooks that I have had forever naturally fall open at my go to recipes and a stranger looking through them would be able to spot my favorites by the amount of splatters on the page.

I have been meaning to make myself a cookbook stand in the hopes it would keep my cookbooks a little cleaner and out of the way when I am using them. When I found this little white cookbook stand with decorative painting for fifty cents at the Ann Arbor ReUse Center on Sunday I thought it would be an easier alternative to just buy it and give it a little make over.

The fruit design was a little to cutesy for me  and the finish looked worn and shabby so I thought a fresh coat of paint would spruce it up. First, I thought I'd add a little extra interest to it by adding a top border of drilled holes. I wanted to follow the curve of the top piece of wood so I traced it on a piece of paper and cut it out for a pattern. I then lined it up about 3/4" below the top of the wood and traced the line. I marked my drill holes along the line every 1/2" starting from the center. To protect my work surface I put a piece of scrap wood under the cookbook stand to drill into.

After I finished making my decorative holes I sanded the piece smooth (the previous decorative painting was a bit raised) and then wiped it down to remove and sanding dust. I used a grey spray paint primer and then finished it off with two coats of red spray paint.

I like how the cookbook stand turned out and this was way cheaper and faster than building something from scratch myself. Now I'll just have to start using it to see if keeps things a little tidier when I am cooking...


Sunday
Feb262012

Japanese Bath Salt Wall Art

One of the things on my list to get done in my bathroom was to hang some wall art around my window. As I've mentioned before I love my Japanese bath salts and since I think the packaging designs on them are cool, I thought that framing a few of them would be fun.

I bought four inexpensive 11" x 14" frames from Meijer and picked out four bath salts that had packaging in blue/green/teal colors that worked well together and I liked. I made a slit on the back of each package, careful to make sure I didn't cut the front, and poured the bath salts into plastic sandwich bags to save for later. I'm definitely not one to waste bath salts!

I cut pieces of white watercolor paper to the size of the frame openings and used double stick tape to attach the bath salt packaging to the paper. After slipping the papers into the frames and hanging them on the wall my project was complete. You can't really see it in the pictures but the texture of the watercolor paper makes a nice contrast with the shiny bath salt packages. This was a super easy way to add some personal wall art to my bathroom and it makes me smile to see them hanging up.

If you are interested, check out the rest of my bathroom posts here: Bathroom Blog Posts

Sunday
Feb122012

Fabric Organization for My Craft Room

My fabric stash in my craft room had gotten completely out of control so I decided that I needed to do something about it. Because my plan is to someday build myself a fabric armoire I didn't want to spend much on this project since it isn't a long term solution for me. I already had this white Billy bookcase with a CD insert from IKEA that I had purchased nearly ten years ago for almost nothing in the As-Is section. By moving the CD insert to the top shelf and removing the bottom shelf I thought I could turn the bookcase into some functional fabric storage.

To organize my fabric that is at least 1/2 yard I made my own fabric bolts out of foam board. I decided to make the bolts 6-1/2" x 23" for a few reasons. 23" height allows for easy storage of 45" fabric folded in half plus it was short enough to just fit under the CD insert on the bookshelf. 6-1/2"depth fit nicely on the shelf and worked out well for maximizing the number of bolts (seven) that I would get out of a piece of 30" x 40" foam board. 

To start making the bolts I adjusted my foam board cutter's cutting depth so it was just longer than the depth of my foam board. When I cut foam board I do it in top of an old ratty rug that I don't mind getting torn up a bit from the cutter. I actually keep the rug solely for the purpose of cutting things on it. 

Using my quilting ruler as a guide I cut my bolts out of 30" x 40" foam board per the diagram I drew out. I made a 23" cut across the board lengthwise and then cut the piece into 6-1/2" strips. The leftover top piece was enough to cut one more 6-1/2" x 23" bolt. After cutting my bolts I wrapped my fabric around them and secured the edge with a T pin. 

After getting my larger pieces of fabric wrapped onto my foam board bolts it was time to start organizing the rest of my fabric. The CD insert was the perfect place for storing my fat quarters and I put small fabric scraps sorted by warm and cool hues in some glass jars that I already owned. Larger, bulky fabric scraps (like the fleece left over from my DIY laptop sleeve and the fleece monogrammed scarves I made) got organized into a wire basket that I had. I put my bolts of fabric in the bottom of the bookshelf and since I had a little room left over I also squeezed in an old soda Coca-Cola crate that I bought in Japan. The crate was the perfect size for organizing my thread and on top for fun I put an antique children's sewing that I picked up in Notting Hill in London.

I'm really happy that I was able to make some sort of sense out of my fabric stash and now that I can see everything easily I'll be more likely to use what I have on hand. I'm also glad that apart from spending about $25 for foam board I already had everything else making this an inexpensive organization project. 

How do you keep your fabric stash under control? Do you have a good organization method?

Thursday
Feb092012

Mirror, Mirror On My Bathroom Wall

In trying to figure out what to hang over my bathroom toilet I stumbled across a gold mirror that I already had. My mom had picked it up used but ended up not having a place for it in her home so she had given it to me about a year ago.

I tried hanging it over the toilet to see how it looked. The shape was great but with chrome and silver in the bathroom the antique gold looked out of place. To fix the situation I turned to my old friend, spray paint.

The mirror was old and there was no way to detach the mirror from the frame without causing damage so I had to cut out some butcher's paper in the shape of the mirror and carefully tape it down with painter's tape to protect it. Because of the oval shape of the mirror getting the painter's tape to curve and completely cover the mirror without overlapping onto the frame was a little tedious. After that I had a new looking mirror with just two thin coats of silver spray paint.

I love how it looks on the wall and I am really happy with the results. Best of all it was free since I already had the mirror as well as the silver spray paint. Now I am one step closer to finishing my bathroom

Since I had the silver spray paint out I also decided to update the lid of the canister that I use to store my cotton balls. I've had this canister since I was in undergrad so it was pretty scruffy and worn. Two thin coats of spray paint later and the lid was looking fresh and shiny.

Is anyone else revamping some items they already have? Any spray painting or wall hanging going on in your life?

If you are interested, check out the rest of my bathroom posts here: Bathroom Blog Posts

Friday
Feb032012

Soo Line Fleece Blanket for Grandpa

My grandpa grew up near a railway line in North Dakota and ever since he has loved trains and especially anything to do with the Soo Line. As a boy he would love watching the trains barrel by and the highlight of every summer was his annual trip to his grandmother's house when he would get to actually ride the train himself.

He is always tough to find presents for so for his birthday a few years back I decided to make him a fleece blanket with the Soo Line logo on it. I cut out the logo out of white fleece and then sewed it onto a large rectangle of red fleece. I then layered the red fleece on top of a rectangle of white fleece of the same size. Using my rotary cutter I cut 4" slits through both layers of fabric at 1" intervals all around the perimeter of the blanket. After knotting the red and white strips together the blanket was complete.

The blanket was super easy to make and my grandpa loved it. To this day he enjoys using it for his afternoon naps which makes me happy. It's my favorite gift that I've given him.

Saturday
Jan282012

Making a Bathroom Rug from Towels

This weekend I decided that I needed to get cracking on my long list of items to finish up my bathroom. Since I still had black thread on my sewing machine from making my laptop sleeve, I thought making my bathroom rug would be the perfect place to start.

I have some black in my bathroom with the liner bar tile in my shower and the black ceramic light fixtures so when I stumbled upon a solitary black and white damask towel at HomeGoods I thought it would be perfect for turning into a rug for my bathroom. It was a bit smaller than I wanted, though so I decided to add a black border with two black towels that I picked up from Target. I had priced out buying black terry cloth from a fabric store but buying the bath towels instead turned out to be cheaper.

To start, I trimmed off the binding on the damask towel with my rotary cutter.  The towel was a little puckered on the end so I made sure to trim that part off as well so I was left with a flat rectangle with straight edges. I then cut each of the black towels into two 14" long strips.

I took one of the black strips and pinned it, with the right sides together, to one of the long sides of the damask towel. After stitching the pieces together I pressed the seam flat and repeated the same steps on the other side of the damask towel with another strip of black. I decided on using a 5/8" seam since the material was so bulky.

With the two sides sewn on, I trimmed off the excess black towel so it was even with the damask towel on both ends. On each of the ends I attached another piece of black towel like mentioned above and then trimmed the ends so I was left with a large black rectangle framing the damask pattern. To finish the edges I simply turned the salvage under and sewed it in place with a seam 1/4" from the edge.

I like how the rug turned out and since it is made from towels it is soft under my feet and I can simply throw it in the wash to clean it. It was also great for my budget costly only about $12 to make. Now I need to tackle a few more projects... 

If you are interested, check out how my master bathroom renovation finally turned out: Master Bathroom Renovation Recap

Tuesday
Jan242012

DIY Laptop Sleeve

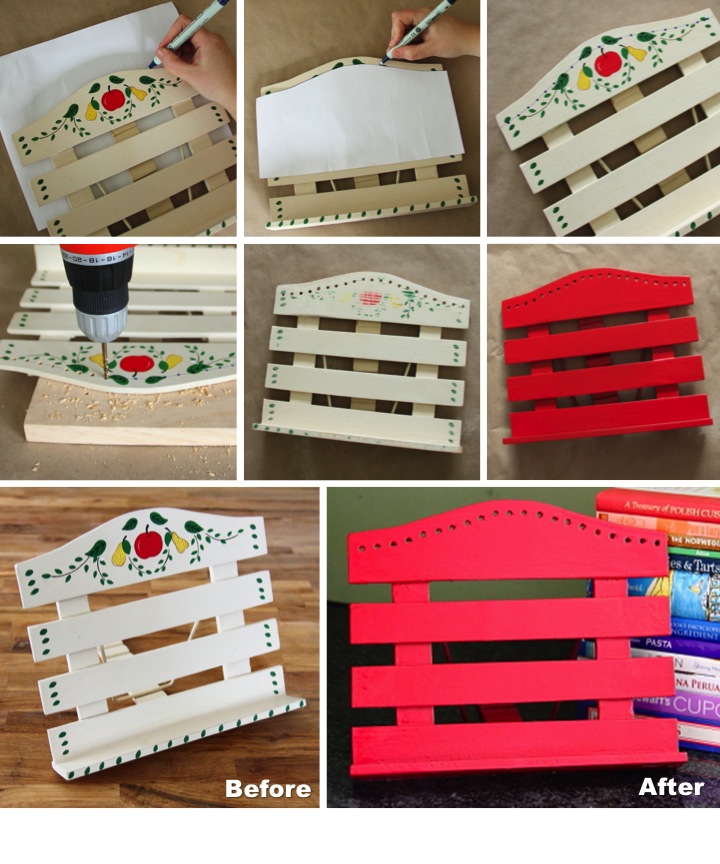
This past fall my little netbook starting acting up and having troubles so I decided to splurge and buy myself a MacBook Air. I absolutely love how light and fast it is and although I was worried about spending the money it was the right decision in the end.

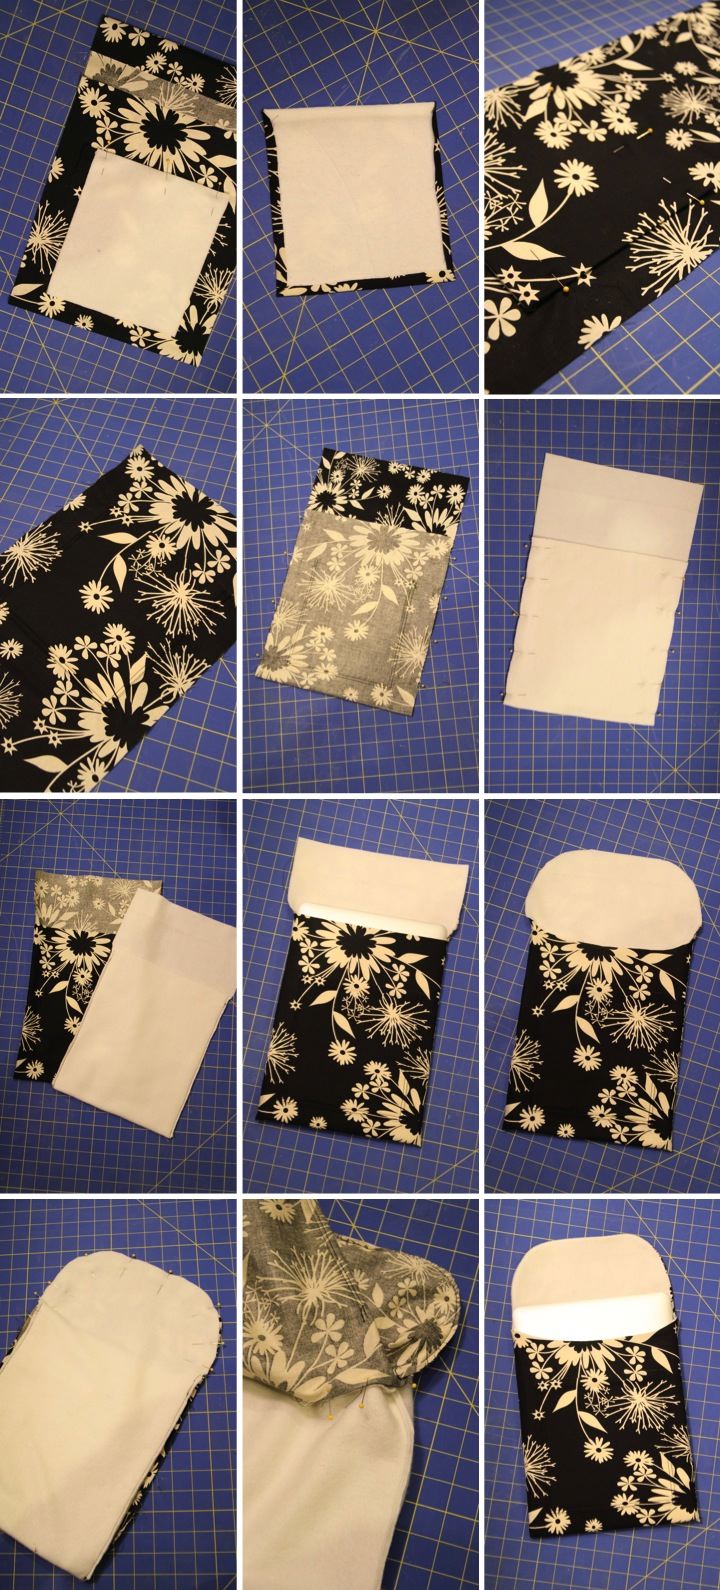
Since I drag it around with me everywhere and I wanted to keep its case shiny and new looking I decided to make a sleeve for it. In order to give it a little padding for protection I decided to use fleece for the lining and then just used a patterned cotton for the outside. 

To start I cut a piece of the fleece and of the cotton. The width of the pieces was equal to the width of my laptop plus the height of my laptop plus 1" for the seam allowance.  The length of the pieces was equal to the twice the length of my laptop plus the height of my laptop plus 3" for the overlapping flap and seam allowance. My laptop is 9" x 13" x 1/2" so that meant my pieces were 10-1/2" wide (9" + 1/2" + 1") and 29-1/2" long (26" + 1/2" + 3").

Before assembling the sleeve I decided that I wanted to put a pocket on the front of the sleeve to hold a few small items like my iPhone connector and my USB to LAN connector. To make the pocket I cut a piece of the fleece that was 7" x 8". I wanted the pattern on my pocket to line up with the pattern on the sleeve so I found a section of the fabric remnant that matched up, cut it out, and lined it up on top of the sleeve so that the patterns matched. I then put the 7" x 8" piece of fleece (right side down) on the spot where I wanted the pocket to be and then pinned the top of it so it went through the pocket cotton but not the sleeve cotton. Unfortunately it is hard to see what I did in the pictures I took since the patterns are lined up.

I carefully removed the pocket cotton and fleece and then (while it was still pinned) trimmed the pocket cotton so that along the top of the pocket it was flush with the fleece and around the other three edges it was 3/8" wider than the fleece. I sewed a 1/2" seam across the top of the pocket and then flipped it right side out. Next I clipped the bottom corners of the cotton and then ironed them over the edge of the fleece. 

Now that the pocket was made it was time to attach it to the sleeve. I lined it up so the patterns matched and then sewed along the side and bottom at 1/2" and then 1/8" from the edge. I did this for two reasons. First, having double stitching would make the pocket sturdier. Second, the raw edge of the cotton that I had ironed over would be between the two rows of stitching so I would have clean look inside the pocket.

With the pocket attached I started working on assembling the sleeve. With right sides together I folded up the bottom 12" (length of my laptop minus 1") of the cotton, pinned it along the sides, sewed it with a 1/2" seam and then clipped the corners. I repeated the same thing with the fleece but because it was so bulky I also clipped down the seam allowance. I then did a dry fit to see how things were working out by turning the cotton right side out, placing the fleece lining inside and checking the fit with my laptop.

I wanted to make the overlapping flap rounded so while I had everything together I cut a curve through both layers of the flap and a scallop across the top of the opening. I then pulled apart the fleece from the cotton, pinned the right sides of the flap together and sewed it with a 1/2" seam. I then continued pinning the right sides of the top opening together (leaving a 3" gap in the middle so I could turn everything right side out) and then sewed it with a 1/2" seam. You could pin and sew the opening and flap at the same time, but it was easier for me to do it in two steps.

With everything all sewn up I turned the sleeve right side out through the gap I had left and positioned the fleece lining inside the cotton. I then used a blind stitch to sew up the gap and I was done. 

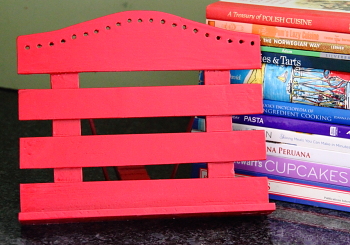
I am happy with the results but think I need to get a button or some velcro to secure the flap. I also think that if I did it again I would make the flap a little longer. At least my laptop will be safe from scratches and dents now.

Monday
Jan232012

Wire Nail Michigan Map Art

My friend, Pam, is moving from Michigan to Minnesota this week. I love having her live down the street from me and although I am excited and happy for her I am sad for me and really going to miss her.

I wanted to make her something to remind her of the Mitten State and all of her friends and family here as a going away present. After thinking about it for a bit I came up with this idea to make a map of Michigan with wire nails and embroidery thread.

To start, I took a 12" x 12" piece of 1/4" plywood and spray painted it black. I then downloaded a map of Michigan from the internet and resized the image so it was approximately 8" x 8". I taped the paper to my plywood and then hammered wire nails (3/4 x 18 size) into the plywood following the map outlines. Due to the spacing I used some of the map detail was inevitably lost (sorry, Old Mission Peninsula!) but it still is unmistakably the Mitten State.

Once I had completed the wire nail outline I gently ripped the paper from around the nails. I think the nails alone look pretty neat and may use that for another project sometime. 

With the paper removed it was time to start adding the embroidery thread. I tied a knot on one of the nails and then started looping the thread around each nail. I learned the hard way that you have to keep the thread taut at all times otherwise you run the risk of the thread coming off the last few nails. I went around the outline three times with the thread before tying it off. I dabbed a little Fray Check on the knots to make sure they wouldn't come undone and then snipped the tails once the Fray Check had dried.

Pam really enjoyed the gift and I like how it turned out so much that I think I am going to make something for my house using some sort of variation of this.  

Sunday
Jan222012

DIY Draft Stopper

There are many things that I love about living in a house that is over a hundred years old, but drafts aren't one of them. With winter here I thought that making a draft stopper for my front door would help keep a bit of the chill out of the house.

To start I used my rotary cutter to trim some fabric to 9" wide and a few inches wider than my door frame. I used outdoor fabric because I wanted something durable and I chose a subtle pattern that I thought would be fun but not too distracting in my entryway.

I folded the fabric lengthwise with right sides together and then sewed it shut, leaving a small opening at the top. I clipped the salvage at the corners, pressed open the seams and, pulling the stopper through the opening, turned it right side out. 

I chose a fine grain kitty litter to fill my draft stopper since it is heavy, compact, and inexpensive. To fill it I made a funnel with a piece of cardstock and poured the kitty litter into the stopper. I made a bit of a mess and I think if I did this again I would decant the kitty litter into something smaller, like a pitcher, to pour it into the stopper.

After filling up the draft stopper as much as I could I used a blind stitch to close up the opening and then placed it under my front door. Now my entryway is a little bit cozier.

P.S. If you are curious, the item hanging from my door knob is a wooden cow bell that I bought in Cambodia this past summer. I love the sound it makes when I open and close my front door.