


Simple DIY Shower Stool
 As I have been working on finishing up projects in my master bathroom as part of my New Year's resolutions I found a few extra items that I wanted to do before I would feel like the bathroom is complete. One of those additions was to make a shower stool for my shower.
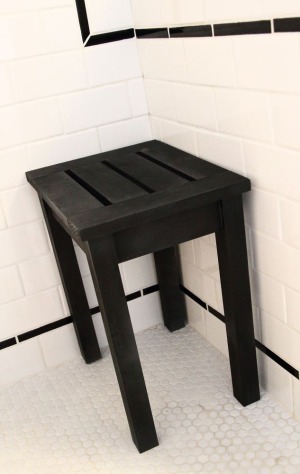
I love my 3' x 5' shower and with all that space I thought that having a little spot to sit down would be really nice. After looking around online and at some stores I couldn't find anything that I liked that was also reasonably priced so in the end I decided to make my own.
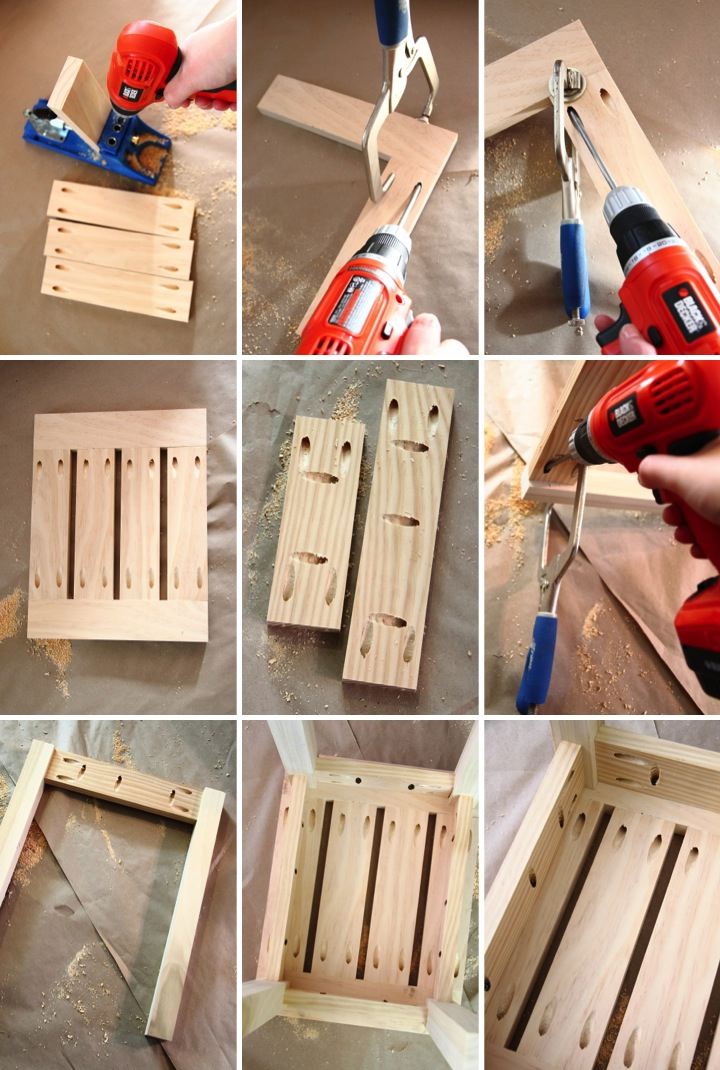
The design is a pretty standard stool design, just made to fit shower dimensions. Completed it stands at 18" tall, 15" wide and 11-1/2" deep. To assemble everything I used pocket holes made with my Kreg Jig which is an awesome tool I learned about on Ana White's amazing and inspiring website. All the pocket holes were under the seat and inside the aprons so I didn't have any holes to patch which was really nice.
It only took about an hour to build the shower stool not including drying time for the spray paint. I already had screws so with the lumber and spray paint I spent less than $20 on the project. I am happy with the results and I think it looks cute in my shower as well as being functional and sturdy.
Supply List:
2 - 2x2 @ 3 feet long
2 - 1x3 @ 6 feet long
1-1/4" pocket hole screws
Cut List:
4 - 1x3 @ 10" for seat slats
2 - 1x3 @ 11-1/2" for seat sides
2 - 1x3 @ 11 for front and back aprons
2 - 1x3 @ 7-1/2" for side aprons
4 - 2x2 @ 17-1/4" for legs
Seat Assembly:
To start I drilled 2 pocket holes on each end of the four seat slats. Leaving 1/2" between each slat I clamped and screwed the slats to the sides.
Leg and Apron Assembly:
For each of the aprons I drilled 2 pocket holes on the ends (for attaching to the legs) and then a few more pocket holes along the top edge (for attaching to the seat). Using a scrap piece of 3/8" plywood as a guide, I marked lines on each of the legs 3/8" in from the edge as guidelines for aligning my aprons.
I lined up the front apron to one of the legs, clamped it and then screwed them together. I then attached another leg to the other side of the apron in the same manner. I attached the back apron to the remaining two legs using the same process as the front.
I clamped and screwed the side aprons onto the front legs and finished making the base by then clamping and screwing the back legs to the side aprons.
Finishing Up:
I laid the seat face down and then centered the base on top of it. I used the already drilled pocket holes to screw the seat and base together.
With all the pocket holes under the seat or inside the apron I just did a light sanding on the piece before finishing it. I used a dark grey spray paint primer on the stool first before applying two light coats of black spray paint.
If you are interested, check out the rest of my bathroom posts here: Bathroom Blog Posts
 Lisa | 5 Comments | Share Article | Email Article | Print Article
Reader Comments (5)
Did you take classes to learn how to do all of these things? Cake decorating, furniture building, etc?
Hi Kathy, apart from taking a sewing class to make a shirt and a pottery class (both when I was in grade school) I haven't taken any classes. My basic approach for anything is that if I want to try something new I read about it a bit on the internet and then just jump in.
My grandma decorated wedding cakes out of her home and when I was a little kid I was mesmerized watching her make cakes. I decorated my first cake (with a bunch of squiggles) when I was four for my sister's first birthday. Even though my grandma wasn't doing it anymore when I got older and I wanted to started trying different techniques I would read about it and then try things until I found what works for me.
For building furniture I really wanted the West Elm sectional for my patio but there was no way I could justify the price. I could tell the design was simple and should be straight forward to build so I went searching online for plans. I found Ana White's awesome website, which had a knock-off version of what I wanted to build, and got started. Through the process of building my patio furniture (that I still need to stain and make cushions for) I learned how things fit together so I can come up with designs myself.
Wondering how well this has held up to the moisture in the shower since you didn't use treated wood and just painted it. Thinking of making one myself but might choose a different finish depending on how yours lasted. :)
I recently purchased a Krug Jig and the plans for this shower stool looked like a nice project to begin to practice my jig skills on. I found enough short pieces of pine in my shop and made all the cuts following your cut list. But as I begn a quick dry assembly of the top I discovered a problem with the dimensions given for the seat sides (11.5"). Four 3" wide slats (total width 12") cannot be accommodated by the side dimension given. For the four slats and half inch spaces the side dimension should be 13". Unfortunately I had to go to the lumber yard to purchase another 1"x4" for the sides of the correct length, but the stool is fabulous. Thanks for posting the plans. It would be good if the dimensions of thre sides were corrected so others won't make the same mistake I made.
Reference the above post in regards to the dimensions being off. This is incorrect. A 1x3 is actually 3/4 by 2 1/2. 4 slats for the seat is 10" (4*2 1/2") and the you have three 1/2" gaps (total 1 1/2"). This means that the side slats for the seat top should be, as stated in the original directions, 11 1/2"
Thank you for the plans