Adding Shelves to My Built-In
With the top of my built-in gussied up with wallpaper it was time to get to work on making the bottom cabinet more functional by adding shelving. Just like hanging my medicine cabinet, this project also addresses both facets of my 2012 resolutions of getting organized and finishing up projects around the house.

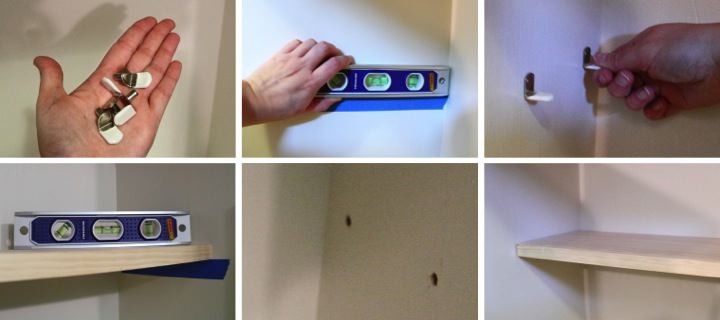
Adding the shelves was pretty easy to do with the only trick making sure to get everything level. I started by picking up a six foot long pine 1x8 board to use for the shelves and some shelf supports from the hardware store. I measured and cut the boards to length and then held them up inside the built-in to get a rough idea of where I wanted them.
I aligned the level where I wanted my shelf to be on the left side of the cabinet and then applied a piece of painters tape directly underneath it which gave me a level guideline. I then measured up the distance from where the board rests to where the peg is located on the supports and drilled holes at that spot 1-1/2" and 6" from the back of the built-in. I put the supports in the holes and then used my level again to check that it was level.
To get the placement for the right side I put one of my shelf boards on the supports that I had installed, put the level on top of it and then adjusted the board until I got it level. I then put another piece of painters tape underneath the board to mark the level line and measured and drilled the holes in the same way that I did for the left side. I put the supports in the holes on the right side and then repeated the whole process for the second shelf.
After priming and adding two coats of paint to the shelves I was all set to start organizing my built-in cabinet. On the top shelf in the left corner I have two cardboard bins that cost a dollar from Target. One has some basic medicines and band-aids while the other has extras of things like razors and soap. Moving across the top shelf I have a little teal dish that I already owned holding my cleaning sponges and then all my bathroom cleaning supplies.
My middle shelf is organized with metal baskets that I also found at Target. The leftmost basket has things that I don't use very often like suntan lotion, bug spray and nail polish remover. The other two baskets hold my sample sized items. Whenever I stay at hotels I always take the mini shampoos, lotions or whatever else may be offered to guests in the bathroom. They are great for packing on my travels or if I have a house guest that forgot something. Over time I had amassed a ridiculous amount of hotel toiletries so I decided to pare things down to just these two baskets with liquid items like shampoo and conditioner in the middle one and dry items like bars of soap and hair brushes in the right one.
Finally on the bottom shelf I have my extra bath towels and toilet paper. It feels good to have everything organized and by limiting myself to the space available it forced me to go through what I had and throw out a lot of things that I just didn't need. Nail polish that changes color in the sun? Gone. Twenty hotel shower caps? Maybe keeping three is enough. Now I just need to keep everything this way!
Is anyone else out there trying to get organized? How is it going? Do you have any tips to share?

If you are interested, check out the rest of my bathroom posts here: Bathroom Blog Posts

 Tuesday, February 7, 2012 at 8:22PM

