As part of my New Year's resolution to get projects finished up at my house I thought that I would tackle my master bathroom first since there isn't too much to do and it would be an easy first step. 
When I first moved in, the room where my bathroom is seemed to have been used as a kitchen at some point since there were some remnants of plumbing sticking out of the wall and some remnants of tea kettle wallpaper. It was a great, nice sized space (10' x 10') with hardwood floors but there were no outlets and the horsehair plaster was crumbling off the walls and ceiling. The room is adjacent to the two tiny rooms that I combined to make my master bedroom so I decided to make it into my master bathroom.
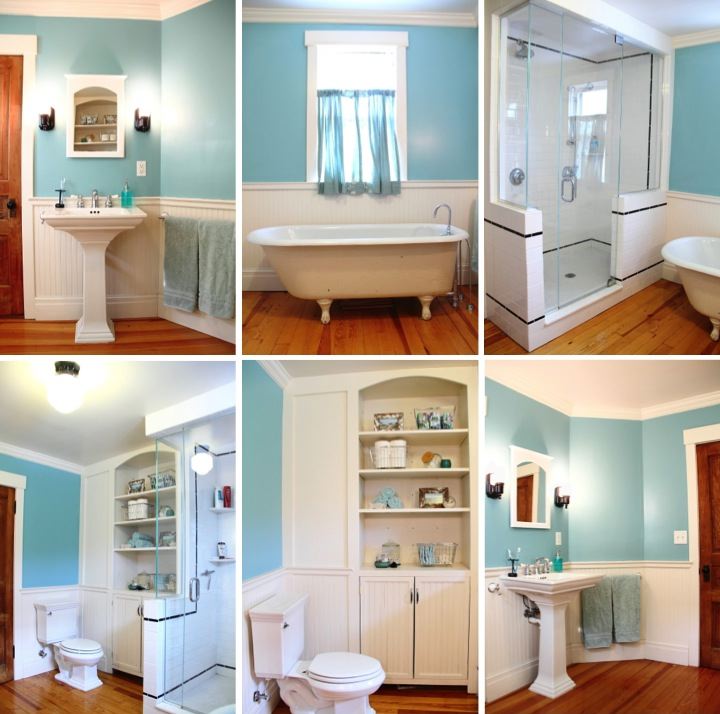
The room required a complete renovation, tearing everything down to the studs, adding all new electrical, plumbing, and HVAC and refinishing the floors. I moved in the cast iron tub from the tiny upstairs bathroom and built a 3' x 5' walk in shower that I tiled with subway tile for a period look in keeping with my house. The built-in provides a nice storage space and also makes good use of the niche left after the chimney was boxed in. Having the built-in also allowed me to use a pedestal sink instead of having a vanity which I liked for having an open look in the bathroom. The lighting fixtures are vintage reproductions and I bought the antique glass shade for the overhead light on eBay. I wanted the bathroom to be be bright and cheery so I painted the room a fun teal color. One of my favorite parts about the bathroom is the wainscoting that goes around the room which I think adds a lot of charm. The pictures below show how my bathroom is currently, starting with the sink and going counter-clockwise around the room.
While I love how things have turned out in my master bathroom, I have a ton of small projects to finish up before I will feel like it is complete. Here's my current to-do list:
- Paint the outside of the tub teal (it is currently a light creamy yellow)
- Replace the cheap, temporary mirror with a medicine cabinet
- Add shelving to the inside of the built-in cabinet
- Jazz up the built-in with some color
- Make a wood vent cover to go over the ceiling fan (the plastic cover that came with the fan just doesn't fit in with the vintage look of the bathroom)
- Make a rug to go in front of the bathtub
- Add some wall art and do some paint touch-ups
I'm still out of town right now, but I'm looking forward to start tackling some of these projects when I get home.